How to Fix Vans Shoes : Expert Tips for Shoe Repair
To fix Vans shoes, clean with mild soap and water, air dry, and use white vinegar for stubborn stains. Vans shoes are stylish and comfortable footwear loved by many.
Whether you’re a skater, fashion enthusiast, or simply enjoy their classic look, keeping your Vans clean and in good condition is essential. In this guide, we will discuss how to fix common issues with Vans shoes, including cleaning methods, treating stains, and general maintenance tips to ensure your favorite pair lasts for a long time.
Whether your Vans are dirty, scuffed, or smelly, we’ve got you covered with simple and effective solutions to keep your beloved shoes looking fresh and stylish. Let’s dive in and learn how to fix Vans shoes to keep them in top shape.
Essential Tools
When it comes to fixing your beloved Vans shoes, having the right tools handy is essential. With the right equipment, you can easily tackle common issues such as loose soles or torn fabric. So, let’s dive into what you’ll need to gather before embarking on your shoe repair journey.
What You’ll Need
To fix your Vans shoes, there are a few essential tools you’ll need to have on hand. These tools will make the repair process smoother and more efficient, ensuring that your shoes are restored to their former glory in no time. Here’s a rundown of what you’ll need:
- A shoe repair adhesive or glue:
- Sewing supplies, including a needle and thread:
- Scissors:
- Pliers:
- An awl or a hole punch:
- A shoe brush:
- Spare shoelaces:
- A set of replacement eyelets:
Gathering Your Materials
Now that you know what tools you’ll need, it’s time to gather your materials. Take a moment to collect all the necessary items before starting the repair process to ensure a seamless experience. Here are some tips to help you organize your materials:
- Find a clean and well-lit work area where you can lay out all your tools and materials.
- Inspect your shoes to identify the specific areas that need fixing.
- Based on the repair required, gather the appropriate tools and place them in a designated area.
- Ensure you have sufficient lighting and ventilation in your workspace for a comfortable repair experience.
- If using adhesives or glues, read and follow the instructions carefully to ensure proper usage.
- Keep spare shoelaces and replacement eyelets easily accessible for quick replacements.
- Remember to organize your sewing supplies, including needles and threads, in a way that helps you identify specific colors or types quickly.
- Consider using a shoe brush or a soft cloth to clean your shoes before starting the repair process.
By following these simple steps and ensuring you have all the necessary tools and materials, you’ll be well-prepared to fix your Vans shoes like a pro. So, let’s get started on giving your favorite shoes a new lease of life!
Assessing The Damage
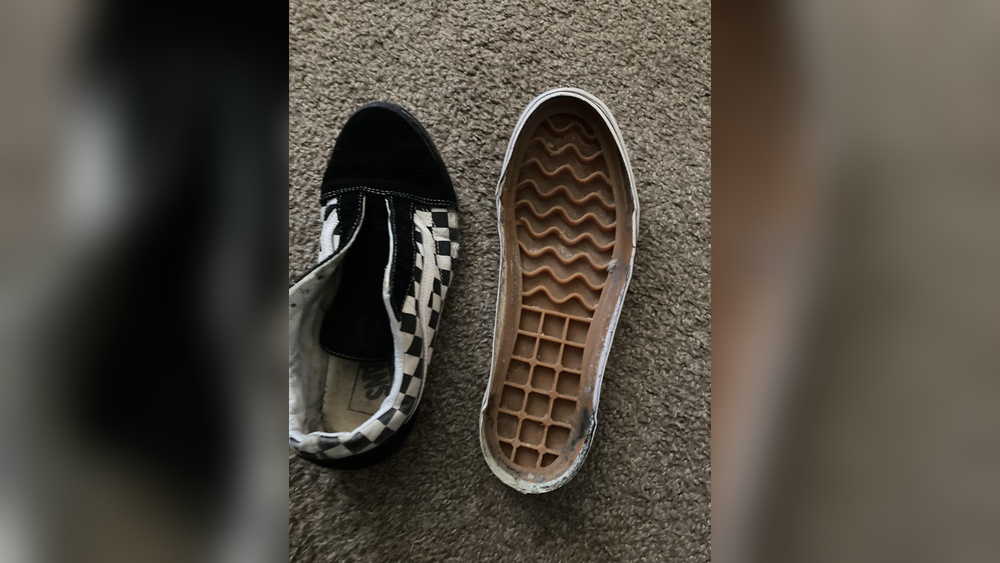
If your Vans shoes are showing signs of wear and tear, it’s important to assess the damage before attempting any fixes. Start by identifying the areas in need of repair and then gather the necessary materials to fix them. Whether it’s reattaching soles or patching up holes, a thorough assessment is crucial for successful shoe restoration.
Assessing the Damage: Identify the Problem Areas To begin fixing your Vans shoes, first identify the specific problem areas. Look for signs of wear and tear such as holes, seams coming apart, or damage to the sole. Evaluate the Extent of the Damage Once you’ve identified the problem areas, assess how serious the damage is. Check if the damage is minor and can be easily repaired or if it requires more extensive fixes like replacing the sole or stitching. Inspect whether the damage is localized to a specific region or if it affects the overall integrity of the shoe. This evaluation will help you determine the best approach to fixing your Vans shoes.Cleaning And Preparation
Vans shoes looking a little worse for wear? Here’s how to fix them with a quick and easy cleaning and preparation process. Say goodbye to dirt and scuffs, and hello to fresh-looking shoes!
Remove Dirt And Debris\
To start, scrape off any visible dirt or mud using a soft brush or cloth. Gently tap your shoes together to dislodge loose debris. \Prep The Shoe Surface\
Using a mild soap and warm water, clean the entire shoe surface with a soft-bristled brush or cloth. Rinse thoroughly to remove any soap residue.Choosing The Right Adhesive
To repair Vans shoes effectively, it’s crucial to choose the right adhesive. Opt for a strong, flexible glue suitable for fabric and rubber bonding. Ensure a clean surface for the adhesive to adhere properly and allow ample drying time for a secure fix.
When it comes to fixing your beloved Vans shoes, selecting the right adhesive is key. A strong and durable adhesive can help extend the life of your shoes, keeping them intact and looking fresh for longer. In this section, we will discuss the different types of adhesives available and guide you in selecting the ideal adhesive choice for your specific repair needs.
Understanding Different Adhesive Types
Before diving into the selection process, it is important to have a basic understanding of the different adhesive types commonly used for fixing Vans shoes. Each type of adhesive has its own characteristics and strengths that make it suitable for particular repairs.
Here are some of the most commonly used adhesives for fixing Vans shoes:
- Epoxy: This adhesive is known for its exceptional bonding strength. It is ideal for repairing large or heavy-duty parts of your shoes, such as the sole or heel. Epoxy provides a long-lasting and permanent bond, ensuring that your repaired shoes can withstand regular wear and tear.
- Silicone: Silicone adhesives are popular for their flexibility and resistance to moisture. They are ideal for repairing areas that require a degree of flexibility, such as the edges or seams of your Vans shoes. Silicone adhesives provide a strong and waterproof bond, ensuring your repairs stay intact even in wet conditions.
- Super Glue: Known for its quick-drying and strong adhesive properties, super glue is a popular choice for minor repairs on Vans shoes. It works well for reattaching small parts like rubber trims or fabric patches. It is important to note that super glue may not be suitable for repairing heavy-duty or flexible parts of your shoes.
Selecting The Ideal Adhesive Choice
Now that you have a basic understanding of the different adhesive types available, it’s time to choose the ideal adhesive for your specific repair needs. Consider the following factors:
- Type of Repair: Assess the extent and nature of the repair needed for your Vans shoes. Determine if it requires a strong and permanent bond or a flexible and waterproof bond.
- Materials: Take into account the materials you will be bonding together. Different adhesives work better on specific materials, so make sure to choose one that is compatible with the materials of your Vans shoes.
- Drying Time: Consider how quickly you need the adhesive to set and cure. Some adhesives have a quick-drying formula, while others may require longer drying times.
- Application Method: Check the application method of the adhesive. Some adhesives come in tubes with nozzles for precise application, while others may require mixing before use. Choose an application method that suits your repair skills and needs.
By carefully considering these factors, you can select the ideal adhesive choice that will effectively fix your Vans shoes. Remember, using the right adhesive will not only ensure a successful repair but also help maintain the overall quality and longevity of your favorite pair of shoes.
Applying The Adhesive
When it comes to fixing Vans shoes, applying the adhesive correctly is crucial for ensuring a long-lasting repair. Here’s a step-by-step guide to help you apply the adhesive effectively to your damaged Vans shoes.
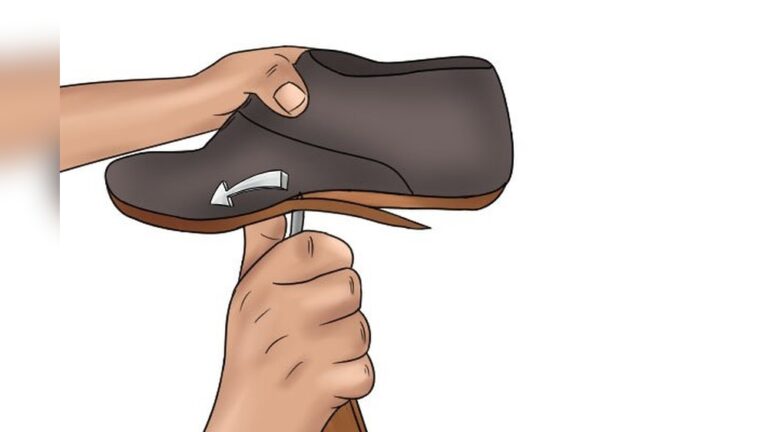
Applying The Adhesive To The Damaged Area
Before applying the adhesive to the damaged area of your Vans shoes, make sure to clean the surface thoroughly with a mild detergent and let it dry completely.
Using a small brush or applicator, apply a thin, even layer of shoe adhesive to the damaged area. Be sure to spread the adhesive evenly and cover the entire damaged area.
Ensuring Proper Bonding
Once the adhesive is applied, press the damaged area firmly together to ensure proper bonding. Use clamps or rubber bands to hold the area in place while the adhesive sets.
Let the adhesive dry for the recommended time as per the product instructions, typically around 24 hours, to ensure a strong and durable bond.
Reinforcing Weak Areas
Vans shoes are known for their durability and style, but just like any other shoes, they can develop weak areas over time. Understanding how to reinforce these weak spots can help extend the lifespan of your Vans and keep them in top condition. This guide will cover how to identify weak spots and add extra support to ensure your Vans shoes remain sturdy and comfortable.
Identifying Weak Spots
Before you can reinforce the weak areas of your Vans shoes, you need to identify where they might be. Common weak spots on Vans shoes can include the toe cap, sole separation, and worn-out laces. Inspect your shoes carefully to locate any signs of wear and tear.
Adding Extra Support
Once you have identified the weak spots, you can take steps to reinforce them. One method is to use a strong adhesive such as shoe glue to reattach any separated soles or secure loose seams. Additionally, you can reinforce the toe cap with a protective layer of rubber or leather to prevent further damage.
Allowing Proper Drying Time
When it comes to fixing your Vans shoes, allowing proper drying time is crucial for ensuring the longevity and quality of your repair. By giving your shoes enough time to dry, you can prevent potential damage and ensure that your repair lasts. In this section, we will discuss the importance of following the manufacturer’s guidelines and ensuring sufficient curing time for your Vans shoes.
Follow The Manufacturer’s Guidelines
Before attempting any repair on your Vans shoes, it is essential to consult the manufacturer’s guidelines. These guidelines provide valuable information on the materials used in your shoes and the recommended drying methods. By following these guidelines, you can avoid potential mistakes that may lead to further damage.
It is important to note that different materials used in Vans shoes may require different drying techniques. For example, canvas shoes might need air drying, while leather shoes might require a more delicate drying process. By adhering to the manufacturer’s guidelines, you can ensure that you treat your shoes appropriately and prevent any unnecessary damage.
Ensuring Sufficient Curing Time
After performing the necessary repair on your Vans shoes, it is vital to allow sufficient curing time. Curing time refers to the period required for the adhesive or glue to fully bond and dry, ensuring that your repair stays intact. Rushing this process may result in a weak bond, causing the repair to fail prematurely.
The duration of the curing time can vary depending on the adhesive used and the repair performed. Some adhesives may require a few hours, while others may need a full day or more. It is crucial to check the product label or consult the manufacturer’s guidelines for specific curing time recommendations.
During the curing process, it is essential to keep your shoes in a well-ventilated area with moderate temperature. Direct sunlight or excessive heat can potentially affect the quality of the drying process. Additionally, it is essential to avoid applying any pressure or stress on the repaired area during the curing time, as this can compromise the bond.
In conclusion, allowing proper drying time is crucial for fixing Vans shoes effectively. By following the manufacturer’s guidelines and ensuring sufficient curing time, you can prolong the life of your repair and maintain the durability of your beloved Vans shoes. Take the time to give your shoes the attention they deserve, and you’ll enjoy their comfort and style for many adventures to come.
Finishing Touches
Learn how to enhance your worn-out Vans shoes with simple repairs and finishing touches. From patching up holes to freshening up the color, restore your favorite kicks effortlessly. Master the art of fixing Vans shoes to keep them looking as good as new.
Trimming Excess Adhesive
Inspect the shoe for any excess adhesive. Carefully trim any protruding adhesive with sharp scissors.
Cleaning Up The Shoe
- Use a damp cloth to wipe off any excess glue or dirt from the shoe.
- For stains, create a mixture of mild soap and water. Gently scrub the area.
- Dry the shoe naturally to avoid any damage to the material.
Frequently Asked Questions Of How To Fix Vans Shoes
How Can I Clean My Vans Shoes?
To clean your Vans shoes, start by removing the laces and brushing off any loose dirt. Use a mild soap and water solution to gently scrub the shoes, then rinse them with clean water. Allow the shoes to air dry, and avoid using a dryer or direct heat source.
Can Vans Shoes Be Put In The Washing Machine?
Yes, you can wash Vans shoes in the washing machine. First, remove the laces and insoles, then place the shoes in a mesh laundry bag. Use a gentle cycle with cold water and mild detergent. After washing, air dry the shoes away from direct heat.
What Is The Best Way To Dry Vans Shoes?
The best way to dry Vans shoes is to remove the laces and insoles, then stuff the shoes with crumpled paper towels to help absorb moisture. Place the shoes in a well-ventilated area at room temperature to air dry. Avoid using a dryer or exposing them to direct sunlight.
How Can I Remove Odors From Vans Shoes?
To remove odors from Vans shoes, sprinkle baking soda inside and leave it overnight to absorb any lingering smells. Alternatively, you can use a shoe deodorizer spray. Ensure the shoes are completely dry before wearing them again to prevent odor buildup.
Conclusion
To wrap it up, fixing your Vans shoes doesn’t have to be a daunting task. By following these simple steps and utilizing the right tools, you can bring your favorite pair back to life. From cleaning and re-gluing to replacing worn out parts, taking care of your Vans will ensure their longevity and continued style.
So go ahead and give your shoes some TLC – your feet (and fashion sense) will thank you!